Our 50s Kitchen Renovation - The Final Wrap Up
Guest written by Chris
- Vintage Youngstown Kitchen Cabinets
- Custom Metal Trimmed Countertops
- Wilson Art "Delightful Jade" boomerang-patterned laminate
- countertops
- Double Drainboard Elkay Metal Sink
- Chicago Faucets Kitchen Faucet
- Custom-Built Shelving and Fridge Surround
- Trash Can Nook and Tall Appliance Storage
- Vintage Lighting
- Tarkett "Expressions" VTC Flooring
- Laundry Room
- Converted Porch Breakfast Area
RESOURCES
Contractors & Sub-contractors:
- MacLeod Construction
- Custom Sheet Metal (metal trim)
Materials:
- Elkay Sinks
- Chicago Faucets
- Wilsonart
- Tarkett VTC Flooring
- Marvin Windows & Doors
- RetroAZ (cabinet starbursts)
- www.spoonflower.com (custom-printed fabric
Vintage Inspiration & Decor:
View of our old kitchen, from the dining room.
When we moved into our first house 13 years ago, one of the many things we loved about the house was the kitchen. It was also probably one of the reasons we were able to get the place, because anyone else would have had to rip it out and replace it entirely. The house itself was built in 1886, but the kitchen had been done in the mid '50s. The kitchen had this terrible salmon on top of brown paintjob, an asbestos tile floor which was cracking and chipping, 30 year old stove and washing machine (not dish washer, you know, for clothes), and a sink base which was a mismatched size made with melamine and plastic handles straight out of the ‘80s or '90s.
What we loved about it though were the cool steel cabinets. All of the cabinets and countertops except those in the sink base were steel, with crazy shiny curved trim and kick ass boomerang shaped handles. As we moved in, we immediately and hurriedly painted the room, and re-decorated what we could, but basically we settled into a cramped kitchen, using our clothes washer and dryer as ad-hoc food prep space as we dreamed about someday fixing things up the Right Way.
View of the kitchen from the old entry way
The original porch area.
Over the years, we’ve done a couple of other renovations, reclaiming some of our barn as a new living room, updating our restroom, and looking ahead toward insulating and rewiring the rest of the house. The logical place to start that project was the kitchen. We kiss goodbye to some knob & tube wiring, say hello to some insulation, and finally get the floor fixed and the walls repainted. Quick spruce up job, right? Well of course by this point, we knew exactly what we had in the Youngstown cabinets we had fallen in love with at first sight, and had been decorating our house by and large with mid-century furniture and were intent on keeping these cabinets intact and refinishing them so wouldn’t let down all the new construction we were sure we’d have to do. Our biggest goal aside from the wiring and insulation was to get a decent amount of counter space, which we guessed would all have to be custom construction.
However as it happens, just as we were getting ready to start getting quotes and getting serious about doing the project for real we found a large set of Youngstown cabinets for sale in Rhode Island, which would basically double what we had, so we snapped ‘em up for $500. That began a 4 month cabinet refinishing and repair project that netted us a second lazy-susan, second upper corner cabinet, and a sink base with a very nice front, but with deeply rusted sides and interior, as well as many other lower cabinets and odds and ends.
The newly refinished Youngstown Cabinets, ready to be installed.
With all of these new cabinets in play, the design process really started in earnest. Since we could effectively do the entire space in existing original cabinets now, a lot of the custom carpentry would be able to go away, but we also wanted to maximize how many of these cabinets we could cram in the roughly 12x12 foot space. Our first design was really indicative of a desire just to jam as much stuff into the same space as we could. After demolition began, it dawned on us that we were looking at it the wrong way and that we really could do whatever we wanted, so we radically changed the design, fixing everything which had been annoying us for the last decade.
Layout of the original kitchen
Layout of the new kitchen
We also planned to bring our 3 season sun-porch "inside" and use that as a breakfast space and laundry room. This added to the cost of the project, but gave us not only a breakfast nook, but also a great space to put our washer/dryer that wasn't "shove it in the 130 year old damp, dark basement with the spiders and the puddles and slam the door". The porch also got a nice new gliding window from Marvin which floods both rooms with light.
New eating area with laundry room at the end
The new laundry room
As the project rolled on, it became apparent that the original steel Youngstown kickplates, lovingly restored by Natalie, were going to make leveling the cabinets a nightmare, so our contractor decided it would make things much easier to just build a plinth and attach the cabinets directly to that.
Cabinets during installation, on custom wooden plinth.
We did end up with some custom woodwork. We wanted, but couldn't put our hands on, one of the 15" Youngstown rounded corner "end cap" display cabinets, so we had a similar corner shelf custom built and are actually happier with the result. The fridge surround includes bulk storage above the fridge, as well as some very deep & tall shelves to store large appliances like blenders and popcorn makers which don't see day-to-day use, as well as space for our trash can and cardboard recycling. We also had a large bookshelf built next to the broom closet for the many vintage cookbooks and multimedia junk we accumulate.
Custom fridge surround with tall appliance shelves and trash can storage.
Custom-built cookbook shelf
Custom-built corner shelf
The original Youngstown metal trim
The one thing we really wanted was to preserve that original curved steel Youngstown backsplash and countertop nosing. Our original plan was to try to re-use the original pieces we had all in one area, sort of to say "here's the original" in that one section, and then to implement something like Pam Keuber's solution on Retro Renovation. As we took apart the original cabinets however, it became apparent that we wouldn't be able to re-use the countertop. It's all basically welded together and the depth would be too narrow to match up with the new countertop, so we'd have to just write that off and do the whole thing with the commercial molding.
New custom metal trim
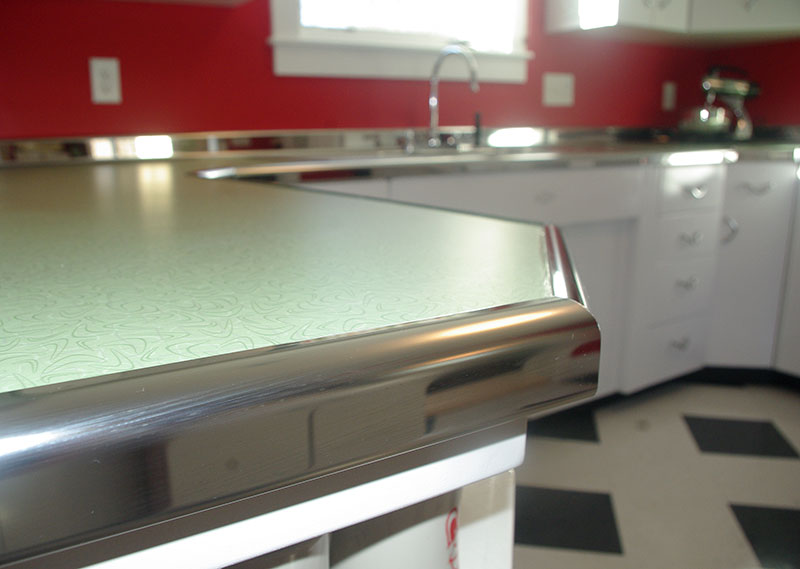
A close-up view of the metal trim replicating the Youngstown Kitchens trim.
Our contractor had other plans though. He told us he "has a steel guy who could bang this stuff out, no problem, I'm not even worried about it". When the contractor gave his ballpark estimate for that cost, it was well beyond the cost of just buying the trim pre-made and fitting it (about 7x), but we were willing to wait until we got the actual quote before getting too nervous about it. The decision was made easier when the steel guy came in at about 1/2 that original guesstimate. Ultimately we estimate this was about triple the parts cost of going with pre-made tee-molding and laminate backsplash, but we believe it was well worth it to preserve the unique look of the original countertop. Meanwhile, somewhere in Ohio, there is a rusting machine whose whole job was to press this stuff out. Our steel contractor probably would have loved to have gotten his hands on that machine for a day or two, but he did a great job matching the original.
View of the Elkay Sink, Wilsonart countertop and metal trim
Early in the process, we decided on keeping the red walls, and to have Retro Renovations Delightful Jade boomerang laminate countertop from Wilsonart. We also wanted to keep a retro feel with the kitchen sink and faucet, but at the same time to have as close to professional grade equipment as is feasible, so we bought an Elkay 54" single-bowl sink with double drainboards, and a Chicago Faucets gooseneck faucet and sprayer. The sink has been a huge win, and the drainboards are basically the most convenient thing ever. And that faucet will drill a hole through any plate you're trying to rinse off if you let it.
The view of the finished kitchen from the dining room. The stove and fridge are from Kitchenaid.
Our plan was to re-use the appliances (stove and fridge) that we already had, since neither was really broken, but as things went on, we realized we were going to be putting 15 year old, aging and dingy looking appliances into what was turning out to be a pretty gleaming new space. We also wanted to have the refrigerator space built with a custom surround so it wasn't a looming presence in the room, but that if we did that with our old fridge, it would be too narrow for literally any other fridge we might buy in the future, so we got a slightly wider fridge and new stove to match and donated the still-good appliances. The steel handles and trim of the KitchenAid appliances really make them fit in well with the cabinets and overall aesthetic we wanted, and they're much higher quality than what we started with. Pizza in particular has been a lot less hit-or-miss!
Every part of this build has been tested in the worst-case scenario, and has passed with flying colors. We spent several full days at Christmas time baking and washing dishes and cooking roasts and were never in each other's way, never had a lack of work space, and had no problems finding a spot to put a cooling rack.
It was a long project, but the consistently excellent food coming out of the kitchen are totally worth it. And our contractor and his subs did a terrific job figuring out all the oddball things we wanted to do, learning many skills they'll never have to use again. We couldn't be happier with the result.

The final view of our 1950s inspired, retro kitchen.
The final view of the converted porch breakfast nook.