Sewing a Vintage 1950s Dress Pattern
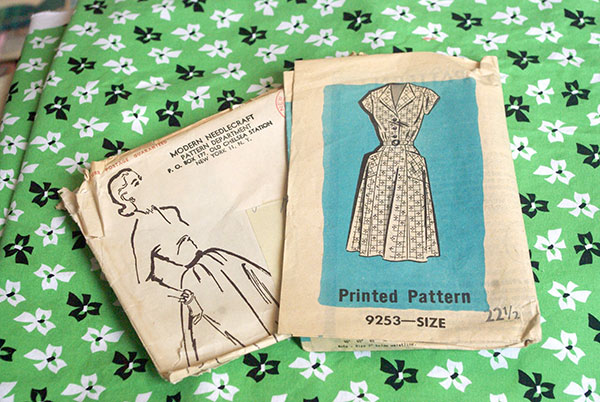
I've been doing a lot of sewing this summer, mostly from modern patterns. I have always wanted to sew from a true vintage pattern, but have been nervous to do so. Earlier this year, I sewed my first vintage pattern. It was a dress for my neice and definitely helped me get over my apprehension. I decided to try to make a "vintage" dress for myself. The pattern I chose was mail-order pattern 9253 by Modern Needlecraft Magazine. This was a mail-order pattern that had been ordered from the back of a magazine, once-upon-a-time. The pattern I had was still in the original envelope it was shipped in and appeared to be unused.
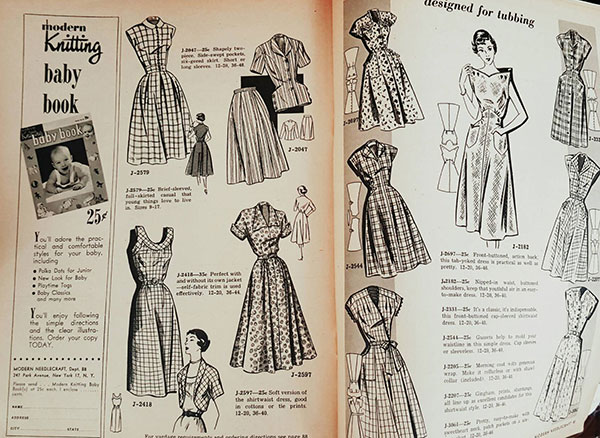
I'm not sure of the exact date of the pattern, but doing a little research I found a scan of a spread from a 1952 edition of "Modern Needlecraft Magazine" and many of the dresses are in a similar style. So, based on that information, I'm guessing it is around that date, if not a bit earlier.
Vintage dress pattern 9253, by Modern Needlecraft.
A spread of the magazine "Modern Needlecraft" from 1952, featuring similar dresses.
For the fabric, I found some novelty quilting fabric at Jo-ann's. They happened to have a "vintage" section of fabric which had many delightful designs that reminded me of true vintage feedback from the 40s. I chose a green fabric with black and white bows. Since it was fairly inexpensive, I decided that I would use this fabric to make a wearable muslin. That way, if I messed it up I wouldn't be using up valuable fabric and if it turned out okay, I'd have a finished dress I could wear.
Modern vintage-styled quilting fabric
Since the dress measurements were fairly close to my own I decided not to alter the pattern for my first go-around. This pattern had a number of options for 3/4, short or cap sleeves and pockets or no pockets. I will always choose pockets when given a choise and opted for cap sleeves. I purchased about a 1/4 yard less fabric than I actually needed for the dress, but I figured a way to rearrange the pattern pieces to squeeze out just enough.
Laying out the pattern pieces.
The instructions for this dress were pretty easy to understand, with only a few terms that I had to research, to make sure I understood what I needed to do. One thing that I noticed with this pattern that I don't often see on modern ones is that the notches were all numbered on the pattern pieces to help you know which notch would ultimately line up to which, on the different pieces. I know this isn't always needed, but there have been times when I had a difficult time interpreting the notches and I thought this labeling was a nice touch.
A close-up of a pattern piece showing a numbered notch. The corresponding notch was also labeled on a separate pattern piece and the two would eventually be lined up for sewing.
I haven't been sewing for all that long, so almost every time I do a new project there is always a new method to learn. This time I was introduced to tucks. I learned that they are similar to darts, but rather than tapering on the ends to create a triangle shape, these are straight stitches resulting in a loose, blousier fit. This dress called for tucks in the bottom of the bodice, front and back, as well as in the shoulders.
The reverse side of the bodice tucks.
The front of the tucks.
I also haven't made too many outfits with collars, so although not a new method for me, still one for which I had to slow down and take my time. This dress had a pointed collar that was part of the front bodice pieces, rather than being stitched in separately. It turned out to be pretty easy to do. If I had to do it again, I might have opted for a solid-colored fabric like black or white, to help the collars stand out from the patterened fabric.
The finished collar section of the bodice
The original pattern didn't have any instructions for trimming the pockets, but I really wanted them to stand out a bit, so I found some black bias tape, with which I trimmed the top of my pocket pieces, before setting them in the dress. I'm really pleased with how this came out.
Black bias tape, chosen as trim for the pockets.
The two pocket pieces trimmed and ready for installation into the skirt.
This dress buttoned up the front of the bodice and needed three buttons. I looked through my buttons stash and found some vintage black bow-shaped buttons that matched the bows in the fabric pattern perfectly. In addition to the buttons, the dress was supposed to have a zipper on the side. I have a similarly shaped vintage dress which I am able to slip on over my head, without the use of zippers, so I realized the zipper wasn't really necessary and I'd be able to get into it just fine. This was a relief as I really dislike installing zippers and I just wanted to get the dress done. The pattern also had instructions for making a matching belt, but since I already had a black belt, I decided to skip that step.
One of the vintage buttons, chosen to match the fabric.
A close-up of the finished bodice, with vintage buttons.
I'm pleased with how this dress came out and am happy with the fit, for the most part. Overall the dress is about a half to a full size too big, but the style isn't meant to be super-fitted, so I'm not too worried about that. I do have plans to make another version, this time with actual vintage fabric. For my next version I'd play with contrasting fabric for the collars and perhaps tweak the shape of the collar a bit. I also think cuffs added to the sleeves would make for an interesting variation. The fabric itself is just quilting fabric so is a bit courser and stiffer than fabric intended for apparel. So, I'd be interested to see how the dress would fit, with softer, more draped fabric.
My dress matches my kitchen!
Side view of the dress
Back view of the dress
I've already taken this dress out for a spin a couple of times. It's already been to numerous antique stores and to get ice-cream and so far everything has held up just fine. It's incredibly comfortable and once was mistaken for an actual vintage dress, which I was very pleased to hear.
Eating ice-cream at Puritan Backroom in Manchester, NH.


